Friday, December 23, 2011

Camper Modification 7-- Conserving 12 Volt Power


If you are a die-hard boondocker, you will be very conservative with power.  Small amounts of  power loss add up very quickly and are sometimes easy and worthwhile to prevent.  Even when turned off, some appliances drain a small amount of "phantom" power from your batteries.

This simple switch from Radio Shack turns off all incoming power to the 12 volt radio, which will be a phantom power draw if you don't do this.

To any boondocker, this is important stuff
                                               
Radio off-- But power still on with phantom load

Radio off-- Power off  and no load

     LED lights are now in common use and are very power efficient.  We use a variety of these, both hardwired  and those with rechargeable batteries.  The light bar above and below is compact, rotates 360 degrees, is adjustable in a number of ways, and runs on three rechargeable batteries.


These Eneloop batteries come pre-charged and hold almost all their power for over one year.  They are excellent and can be found in a number of stores, including Costco.

We charge them in the truck while driving down the road or from our solar system when we need to.

   This is a common LED used in RV's and replaces the original bulb in many light fixtures.

This one fits in a computer USB port and lights the keyboard while running off the computer battery.


Tuesday, December 20, 2011

Camper Modification 6-- Filling Fresh H2O Tank From City Connection


This modification is a little harder to explain.  Our fresh water pump and bucket feed inlet are close to each other on the passenger side of the camper, while the city water connection is on the other side.  As you  know, we filter all incoming water with our sediment filter and only add water in the bucket feed when absolutely necessary.  

So we made a modification to fill the fresh tank with filtered water from the city water connection on the other side of the camper.  The picture above shows the factory pump installation.  Incoming water from the tank comes from the left and leaves the pump on the right.  The hose to the left of the bypass valve is incoming water from the tank and the one to the right of it is open for winterizing.   

There is a valve at the pump that allows water to pass through it in only one direction.  All one has to do is place a line with a shut-off in it between the incoming and outgoing water.  Above is the finished installation with the new red valve in the normal "off" position.  This is the same as before the change.  With the pump on, water from the tank cannot get through the new shut-off and has to go through the pump as before; then out to the blue cold water line and throughout the rig.  When hooked up to water, the city connection fills the blue line and the water cannot get through the new valve because it is shut off.  It can't get through the pump either because of the one way valve at the pump, so water goes throughout the rig again. 

To fill the fresh tank with filtered water from the city connection, all we do is turn "on" the new, red valve as shown above.  This allows water from the blue line to get through the open valve and back up into the tank, thus filling it.  Water cannot get back through the pump because of the one-way valve at it.  There is a vent in the tank to prevent too much pressure buildup while it is being filled.  To make things even better, we open the bucket fill cap to release any air pressure as the tank fills.  Because the bucket fill and pump in our rig are so close to each other, this is easy to do.  The hose curving up over the pump is the original open winterizing hose and is the same as it was before the change.

Friday, December 16, 2011

Camper Modification 5 -- Kitchen Faucet And Biological Filter


The outside filter eliminates sediment particles, but does not affect taste or water quality.  For this purpose, we installed a dedicated faucet on the kitchen sink.  

After finding the best location, a proper size hole is drilled through the counter.

This is easy to do.

The faucet needs to be in a convenient place to use but out of the way, and also needs to be properly located on the bottom side of the counter so it can be firmly and properly attached.

The cold water line is cut where it can be best accessed.

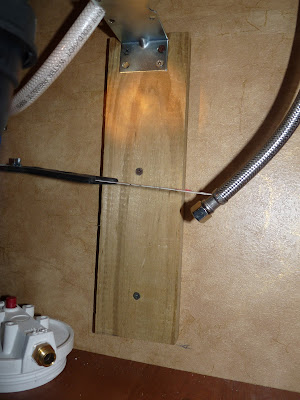
A board can be glued and screwed to the wall to hold the canister bracket in a location where it will be most easy to periodically change the cartridge.

Connections are completed from the water line and faucet to the canister head.  These are the same leak-free and easy-to-use connections as we used outside.

This Culligan canister receives several kinds of cartridges.  We use the best there is for this because this is our drinking water and we get this water anywhere we may be.  Our water tastes the same from Mexico to Labrador and neither of us has ever been sick because of water issues in 11 travel years.
   

Monday, December 12, 2011

Camper Modification 4 -- Outside Sediment Water Filter


Because we live almost full-time in our camper and are often off the grid, we take on water wherever it's safely available.  We also use our water for everything, including drinking.  

                    By installing our whole house sediment filter immediately inside of the city water connection, all water entering the camper is filtered by it. 

This requires some plumbing work, but the leak-free and easy-to-work-with connectors can be obtained at any RV center.

The canister is solidly supported, easy to access yet out of the way, and cheap filters are readily available all over the country.

Quick connects make both hook-up and storage of the hoses easy to do.  After adding some insulation and a storage shelf, this compartment is beginning to shape up.  A little more insulation around the canister will finish it.


Friday, December 9, 2011

Camper Modification 3--Hardwired Whole House Surge Guard


With our solar system and generator we don't often need outside electric power, but when it is available or free we like to make use of it.  We travel all over the U.S., Canada and Mexico and are amazed at the number of RV'ers that just do not understand the most simple workings of electricity.  We never connect or dis-connect from power without first turning off the campground breaker, as is shown above.  After testing with our power monitor and determining that all is well, we know it is safe to plug in and our Surge Guard takes over from there.

  Once we plug in, incoming power goes in the top of our Surge Guard and is analyzed for 2 minutes and 15 seconds before it is allowed to enter the RV.  This protects the A/C compressor.  Power is then continually monitored and will be immediately shut off if voltage goes below 102V or above 132V, or open neutral is present.  After another analyzing period, it automatically resets when power is restored. 
  
Our Surge Guard is on the back wall behind this control panel.  It's built in, light weight, easy to see below the battery tray, and would be hard to remove as no one even knows it's there.

This view below the battery tray shows that line voltage is correct . A lit caution light would warn of a miss-wired pedestal.  High or low voltage would shut the rig off from power and the corresponding lite would be on.

Here is our line monitor inside our rig.  It is easy to see and allows us to keep an eye on things.
 It gives the voltage and other information we like to have, but will not protect the rig from any sudden, harmful changes that do occasionally occur while the rig is hooked up to outside or shore power.  You can be asleep, away from the rig, or right there but you cannot know and unplug the rig ahead of time before these things happen.  That is why you also need the automatic shut-off protection of the Surge Guard.

Wednesday, December 7, 2011

Camper Modification 2-- Catalytic Heater


Even though we have the standard RV furnace in the camper, a catalytic heater is indispensable for boondocking.

We don't often use the furnace, which uses electricity and is very inefficient on propane use.  Our Wave Three heater uses no electricity, is close to 100% propane efficient, and radiates a nice warm, consistent heat.  Catalytic and Ceramic propane heaters are legendary for boondocking use.

A quick disconnect  allows for easy storage when not in use and a 5 foot flexible hose allows for directional placement in use.


   In the nearby outside refrigerator compartment, we "tee'd" into the propane line and placed a shutoff there(shown here in the "on" position) so we can safely shut this off during periods of non-use.

      We use a soap solution to periodically check for propane leaks.  A very handy gadget I also like to  use is this gizmo that runs on two AAA batteries and is very accurate.  I use it first to rapidly search for and locate leaks and then soap the area to zero in on the exact spot.

Monday, December 5, 2011

Camper Modification 1-- Solar System


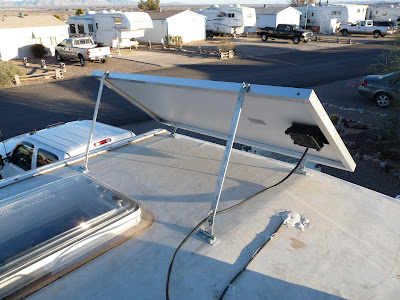
One of the first things we did was to get the solar panels on the roof and out of the way.

We have them set up so that they can be tipped in any direction to face the sun for optimum efficiency.  They are properly set so that when either raised or flat, nothing shades them to block the sun.  We had to move the TV antennae to achieve this.

Two 120 watt panels along with the 2500KW generator are all we need to run everything except the air conditioner.

The 10Ga wire is run along side the sewer vent to the inside controller.

This is a C40 controller, capable of handling 5 of these panels.

 The remote display shows a voltage of 13.1 with one amp charge from the panels.  These panels each can charge 7.1 amps, but the controller has them shut down because the batteries are almost full. That is what the controller is supposed to do.

Two AGM batteries are all that we can fit in and all the weight we want to carry.  The black rectangle on the left battery is a temperature compensator that feeds the battery temperature back to the controller. 


Our good friend, Don Hankins, likes the installation.